• Projects
  • Cosplay Music Videos
  • ko-fi
  • Services
  • Blog
  • News
  • Contact
  • Store
  • Linktr.ee
Menu

M'Guphynn Media

Ideas outside the Box
  • Projects
  • Cosplay Music Videos
  • ko-fi
  • Services
  • Blog
  • News
  • Contact
  • Store
  • Linktr.ee
With so many conventions being rescheduled and canceled, our very own Steve Reeve came up with a great idea to feature some of the Cosplay you have all worked so hard on.

With so many conventions being rescheduled and canceled, our very own Steve Reeve came up with a great idea to feature some of the Cosplay you have all worked so hard on.

Submit your Quarantine Cosplay

April 06, 2020 in Cosplay

The M’Guphynn Media team has been featuring the cosplayers at both Edmonton Expo and Calgary Expo in Cosplay Music Videos since 2013. With the news that the 2020 edition of Calgary Expo has been rescheduled for the summer, we wanted to give an opportunity for our cosplay community to take part in a new Cosplay Music Video right from home. We will be accepting video footage of your cosplay creations throughout the month, and compiling them into a release at the end of the month. We encourage crafters to continue to create and level-up their cosplays while cooped up at home and unable to gather together.

Get creative with your shots, the more dynamic the better. Feel free to send multiple clips per submission. 

Rules and Regulations 

Videos must adhere to all current public health advisories and protocols. We understand that cosplay is often a group endeavor, however, we ask that all submitted videos feature no more than two individuals. Any videos that appear to engage in unsafe practices or occur in high-traffic public areas will not be accepted. 

 Video Footage Specifications:  

Untitled-2.jpg
  • Between 10 to 45 seconds runtime.

  • Minimum resolution of 1920x1080 (1080p)  

  • With a minimum frame rate of 60fps (frames per second)  

  • H264 compression is preferred where possible 

  • Landscape Orientation   

Most DSLR cameras and smartphones are capable of capturing footage with these settings. Tutorial for iPhone settings.  

Videos must not depict any realistic violence, illegal activity, hateful sentiment, or explicit sexuality.  

By submitting a video, you agree to release full usage and broadcast rights of the footage for use in a Cosplay Music Video as well as any and all promotional and marketing materials in perpetuity to M’Guphynn Media Ltd. 

Please include the full names of each cosplayer, as well as any social media accounts to tag. This is so we can credit you properly. 

Submit on our Main Page here

Deadline to submit: 11:59PM (GMT) April 26, 2020 

The final Cosplay Music Video will be posted to the M’Guphynn Media YouTube Channel and will not be monetized by M’Guphynn Media Ltd. We cannot guarantee the inclusion of all submissions, but we will continue to make an effort to include as many people and creations as possible. 

Look for it in May 2020.

Tags: Cosplay, DIY, Do it Yourself, DSLR, Filming, Indie
2019 Edmonton Expo Cosplay Music video

2019 Edmonton Expo Cosplay Music video

Slow Motion: Keeping it Smooth

September 26, 2019 in cinematography

One of the questions we often get asked at both the Conventions and Expos we attend is “How do your videos look so smooth!?” The answer is pretty simple: We’re magic witches from Hogwarts.

When I was first starting out, I thought it was as easy as slowing down a clip in post but would end up with a choppy slow motion shot that didn’t look nearly as good as I wanted it to be. This is one effect you don’t want to fix in post.

The truth is that it’s done utilizing a combination of techniques that support one very important Camera Setting. We shoot at 60 frames per second (FPS). If you’ve ever shot at a higher frame rate, you’ll notice that your footage does look a lot smoother when you follow action shots. As a side note, higher frame rates have become a point of contention with HDTVs in recent years as movies have that odd ‘hyper real’ look to them when your TV has ‘motion smoothing’ setting on. It’s a digital way that HDTVs create additional frames so that motion looks less blurry but often results in an image that looks more like a sporting event rather than a movie. A movie is typically shot and watched as 24fps, in the UK this standard is 25fps. There’s an interesting history about FPS standards which relates to the history of film that I won’t get into in this post. For those interested, check out this article about The Hobbit films and shooting at 48fps.

So, you’re shooting your footage in 60fps but it doesn’t look slow and smooth in your editing suite. Now what?

The reason for this is that the editing sequence (by default) is set to interpret footage in the format it was filmed at. In North America, your export output will be at 24fps. Your sequence settings should match that. Secondly, your clips shot in 60fps need to be reinterpreted as clips matching the 24fps sequence. This will result in your clips being slowed down 2.5x their normal speed. To illustrate further:

In Premiere Pro CC

In Premiere Pro CC

  1. Sequence timeline settings should be 24fps (or 23.976 for DSLR cameras)

  2. Clips that are shot at 60fps should be interpreted as 24fps if you want them to be 2.5x slower.

Viola! Smooth slow motion!

Other things that help:

  • A camera that can shoot at higher frame rates (120fps)

  • A Stabilizing kit for your camera rig (Glidecam, Gimbal, DJI Ronin)

  • Shooting at a flatter focal length (to keep subject in focus during movement)

Our team likes to mix things up in our edit to keep things fresh. Check out our latest Edmonton Expo Cosplay Music video and see if you can spot the difference in the clips that are 24fps and 60fps

ps. Be sure to also follow our NEW project Date Knight.

Tags: Cosplay, Camera, Slow Motion, Music Video, tutorial
Lighting credit: Rhett Miller

Lighting credit: Rhett Miller

Three Point Lighting: Why does it Matter?

April 29, 2019 in cinematography

There’s a huge focus on “The 80’s look” in films today. It’s often achieved using neon lights casting strong shadows. It’s a cool look, I am a big fan of it but there’s something that also bugs me about how it’s often executed. It lacks motivations.

This is not referring to the motivation of the filmmaker or photographer. Often times, their motivations are clear and inspired by some amazing pop-culture. NERDVANA: The Web Series itself is motivated by comics, movies and other pop-culture.

I am referring to the motivation of light.

When I started making films, I would just blow out an image because I could. I had bought an expensive lighting kit and thought that more lights = more production value. How mistaken I was. My preliminary knowledge of three point lighting had me trying all sorts of things to make sure every inch of the frame was literally “lit AF.” The reason was because I knew how to three point light, I didn’t know why I was three point lighting.

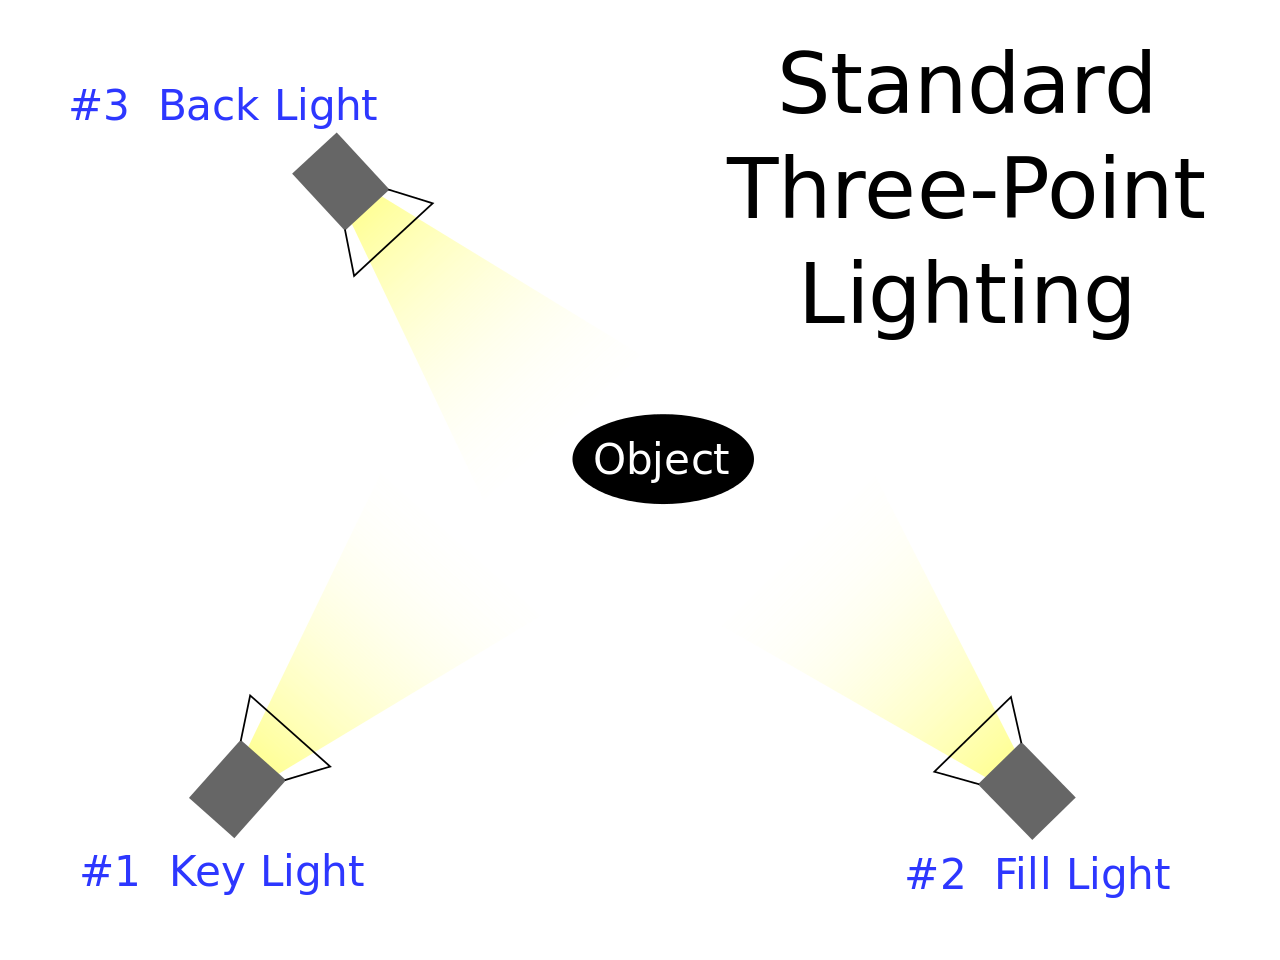
Three Point Lighting is considered the minimum basic lighting for film and photography. it consists of three lights around a subject arranged as such:

  1. Key Light

  2. Back Light

  3. Fill Light

https://en.wikipedia.org/wiki/Three-point_lighting

https://en.wikipedia.org/wiki/Three-point_lighting

Key Light: This light is the main light that is usually positioned straight on your subject. Don’t make the same mistake as me and go into Vistek asking where they keep their “Key lights”

Back Light: This light is often used to outline your subject and give them shape and depth in the frame. Sometimes referred to as a rim light.

Fill Light: This light, also known as the motivated light, adds a final piece of dynamic range to the frame and literally fills in some of the unintended shadows the key or back lights missed.

Do you need all these lights? Besides a key light, the answer is… no

You, as a story teller, need the number of lights required to motivate the story in your frame. A key light is whatever the main source of light is for your subject. It doesn’t need to be a professional light but an image does need a light, even if it’s natural light. A back light will pop your subject from the background and a fill light will add motivation, but these last two are optional.

The distance of these lights also plays an equally important role, but I’ll get into that in a future post.

Lighting Credit: Rhett Miller

Lighting Credit: Rhett Miller

Going back to motivation for a moment and the lack there of. I would later learn, from the talented cinematographers that have inspired and mentored me, that all light requires motivation, that’s the magic trick of good lighting. A light source in or just outside the frame that can be explained in the narrative of the story. In The Good Survivor, the fire Dylan and Steve share did not emit enough light to their faces but we were able to use it as a motivator for the warm oscillating light used to light them off screen.

There are always exceptions. Indie Horror often has strong shadows out of low budget that work in the genres favor. One of my favorite movies “Creepshow” uses a lot of dynamic lighting that doesn’t always have a light source motivator in the frame; but I would argue that the tone of a horror comic book is plenty of motivation for such stylistic genre piece.

With amazing color grading tools available now, it’s easy to slap on some warm oranges and cool blues and assume that’s good lighting. It’s not, and you can only manipulate the information available, which is why it’s also important to understand your cameras ability to capture light and exposing to allow for optimal dynamic range.

A Key Light that is, or simulates, a sunset
A Fill light from a neon sign across from the subject
And a Back Light from a stop light behind the subject changing from Green, to Yellow, to Red

That’s what should at least come to mind when trying to generate “the 80s look”

Speaking of “80’s Look” Check out our latest Cosplay Video from the 2019 Calgary Expo featuring the song “Video Game Champion” by GUNSHIP

Tags: lighting, cinema, film, movies, LED, arri
Sensor-size-comparison.png

Full Frame VS Crop: Which is the better sensor?

March 31, 2019 in cinematography

I’m glad my first DSLR camera was not a full frame.

The first DSLR camera I purchased was a Canon Rebel XTi. It could not take video and it had a 1.6x APS-C sensor. I cut my teeth on this camera and it served me well as a photographer. Many of its features were automatic and I had to guess my way through trial and error when my pictures came out blurry, as well as over or under exposed. As my skills developed through each trial, so did my comfort with disabling the automatic features of my camera.

Soon, I began to not only understand how to use shutter speed, f-stop and ISO settings but more importantly, I began to understand the limitations of my camera. What ISO settings I should not use even though my camera could go up to 5600 ISO. I also learned the difference between my EF-S kit lens and the 50mm EF lens I had purchased afterwards.

I was ready to upgrade.

At this time, having a crop sensor meant two things for photographers/ videographers

  1. Crop sensors are not good for low light

  2. You are amplifying your lens.

For myself, a crop sensor meant I could not shoot photos over 1600 ISO without sensor noise and that my 50mm lens was actually the equivalent of an 80mm lens (50mm X 1.6 = 80mm).

To shoot with my Rebel XTi I needed to be taking pictures with plenty of light and would have to take a few extra steps back to get the framing I wanted. This made me realize I wanted a full frame camera as my next purchase.

Wanted… not needed.

Both limitations of my camera could be overcome by my growing experience. This is important to note as too many photographers and filmmakers place their abilities on the tools they use. A tool is only as good as the person using it. It’s about growing the skill needed to take a compelling picture or tell an engaging story.

The times, they have changed. The Lumix GH5 is an example of a mirrorless camera with a cropped sensor (micro 4/3) that can compete with full frame cameras in low light performance and image quality. The industry seems to be heading that direction as even full frame cameras are becoming mirrorless. The reasons why I upgraded to a full frame camera are not the same reasons someone may upgrade today.

So which is better? It depends.

  • If you have already invested in expensive glass of a certain mount like myself, you will want to stick with cameras that share the same mount as the glass you’ve invested in or be willing to purchase a speedbooster but will still need to consider the amplification.

  • If you’re starting out, do what I did, go with the most affordable option that meets your current needs as a storyteller and then upgrade once you feel the tool you are using has reached its limitations compared to your skill.

What else is new with M’Guphynn Media? Check out our latest Vlog and find out

Tags: sensor, crop, full frame, canon, lens, tutorial, comparison
1 Comment
Newer / Older
Back to Top

info@mguphynn.com